
Set-up guide
Using Freshservice with Traceless
Step-by-step process for how to integrate Traceless with Freshservice

Pilot
Let's get started!
Integrating Traceless with Freshservice lets your team send private data and verify identities from inside a ticket, without switching tools.
Start at traceless.io/integrations or go directly to traceless.io/freshservice/connect.
You will need:
• A Freshservice admin account for your tenant.
• Freshworks Developer Portal access in Freshservice. If you don't have it, enable developer access on your account first.
• A Traceless account with permission to manage integrations.
1
Part 1: Set up a Freshservice agent for TracelessSign up for Traceless.
Traceless connects to Freshservice through its own agent account.
1. In Freshservice, create a new agent for Traceless.
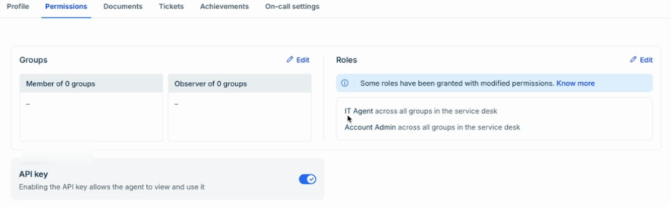
2. Open the agent's Permissions tab and assign two roles: IT Agent and Account Admin. IT Agent gives Traceless access to tickets. Account Admin gives it access to the contacts of your requesters and agents.
3. On the same tab, turn on the API key toggle.
Note: All three settings are required. Without them the integration can't read tickets or contacts.
4. Log in to Freshservice as the Traceless agent, select your profile picture, and choose Profile settings.
5. Under Your API Key, select Show API Key and copy the key. You will paste it into Traceless in the next part.
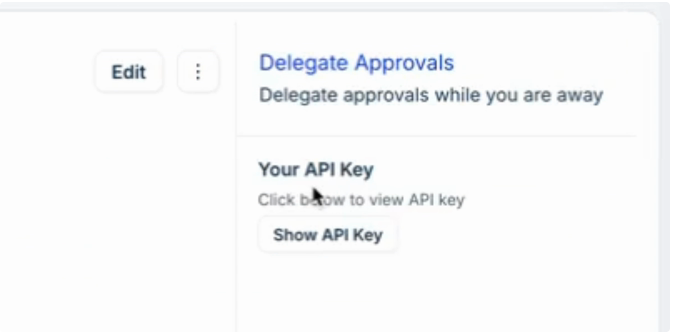
Note: Treat the API key like a password. Don't share it or paste it into tickets, email or chat.
2
Part 2: Connect Freshservice in Traceless
1. Sign in to Traceless. From the start page, choose Create An Integration, or choose Manage Your Integrations and select Create a new integration.
2. Select Freshservice.
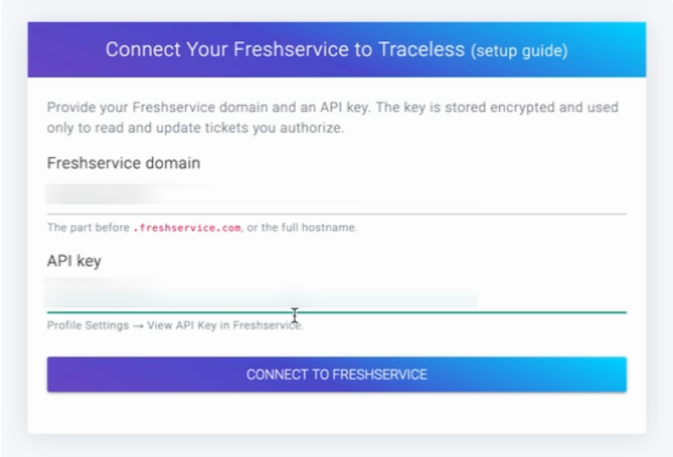
3. Enter your Freshservice domain. Use the part before .freshservice.com (for example, acme), or the full hostname.
4. Paste the API key from Part 1.
5. Select Connect to Freshservice. You land on a "Thank you for choosing Traceless" page.
6. Check your email. You will receive two messages from hello@traceless.com: one confirming the integration, and one titled "Fresh Service installation steps" that contains your installation code. It is a long string of letters and numbers. Keep it for Part 4.
3
Part 3: Install the Traceless app in Freshservice
This part is done in your Freshservice tenant as an admin.
1. Open the apps menu in the top bar and select Manage apps.
2. Under App Type, select Custom. This is where the Traceless app appears.
3. To make the app available to your tenant, open the Developer Portal from the same menu, or with the Go to Developer Portal button at the top of Manage apps, select Custom App, choose your tenant, and follow the installation procedure.
4. Back in Manage apps, select Install next to Traceless. On the Configuration screen there is nothing to set up. Select Install again to confirm. You should see an "App installed" message.
Note: If your account doesn't have developer access, enable it before step 3.
Once it's done, Traceless shows Installed for: Account Wide.
4
Part 4: Activate Traceless in a ticket
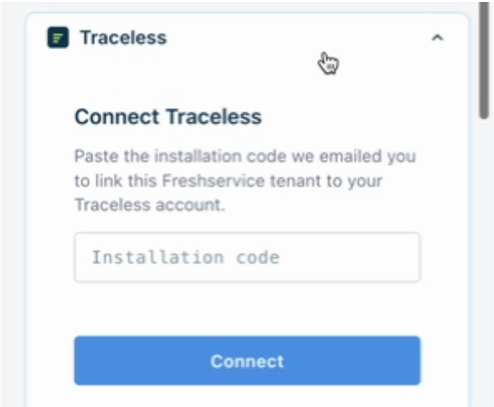
1. Open any Freshservice ticket. The Traceless panel appears in the right sidebar with a "Connect Traceless" prompt.
2. Copy the installation code from the "Fresh Service installation steps" email and paste it into the Installation code field.
3. Select Connect.
4. You should now see the Traceless panel with MFA, Secure Data and Secure Files tabs. That means the app is connected.
Once it's connected, your team can use Traceless in any ticket to:
• Verify identities: use the MFA tab to check who is asking before acting on a sensitive request.
• Send or request private data: share sensitive information from the Secure Data and Secure Files tabs instead of pasting it into the ticket. You can add an optional passcode and set how long it stays available.
• Stay in the ticket: everything runs from the Traceless panel in the sidebar.
You should be good to go! If you run into any issues, use the chat icon on the right to reach us.
Rapid deployment. Immediate risk reduction.
Start with one integration, validate quickly, and expand across your environment.